
iPad Screen Replacement
- Symptom
- Front glass shattered after a drop onto rock. The display underneath still showed a perfect picture, and the touchscreen still responded across the whole panel.
- Diagnosis
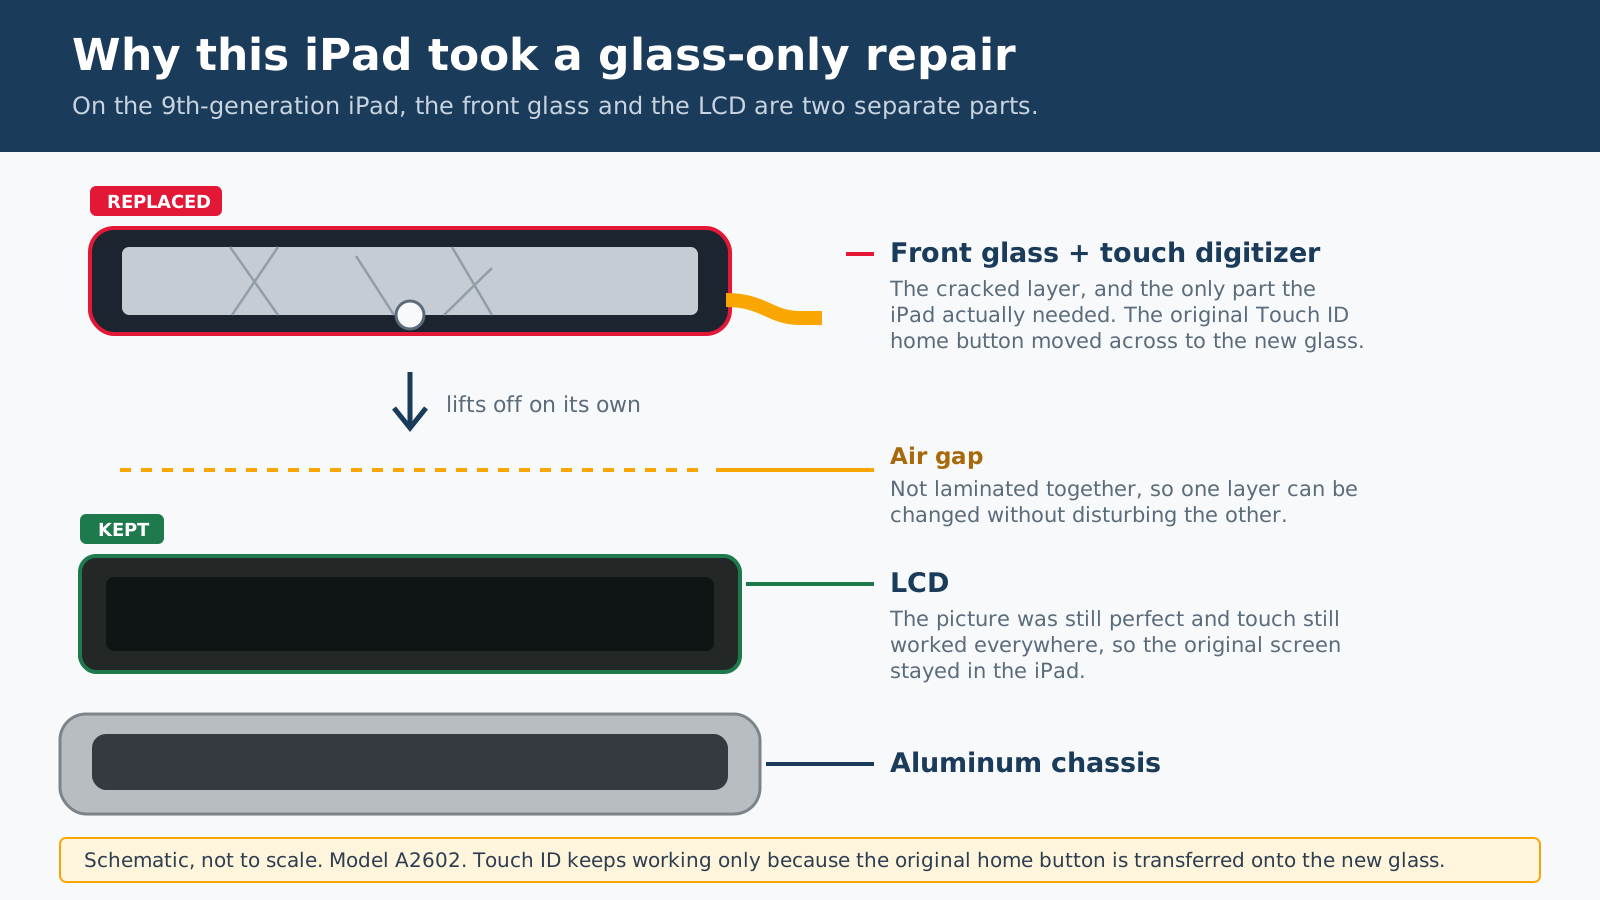
- Identified as a 9th-generation iPad (A2602), which uses a non-laminated display, meaning the glass and touch digitizer are a separate part from the LCD. No visible LCD defects and working touch pointed to damage confined to the glass layer.
- Fix
- Replaced the glass and digitizer only, transferring the original Touch ID home button so fingerprint unlock kept working. The original LCD stayed in the device. Everything was tested before the adhesive was set.
An iPad came in with the front glass shattered from a drop onto rock. Underneath all that broken glass, though, the picture was still perfect and the touchscreen still responded everywhere. On this particular model those are two separate parts, which meant the repair could replace the broken layer and leave the good one alone. Here's how that call gets made, and what the work actually involves.
What This Page Is For
"Cracked screen" sounds like one repair. It isn't. Depending on the model and what actually broke, it can mean replacing a single layer of glass, replacing a bonded screen assembly, or replacing the whole device. Those are very different amounts of money.
This write-up shows the diagnosis behind that decision on one real iPad, and the bench work that followed. The same approach applies to a laptop screen, a phone, or a TV panel: identify exactly which part failed, keep the parts that are still good, and explain the options before anything gets ordered.
The Long Version
From Broken Glass to a Working iPad
What follows is the job as it ran: the identification, the decision, the part, and the six steps on the bench where this repair is won or lost. Skip to the result if you'd rather not read the whole thing.
Step One Is Always Identification
Before any tool touches a device, the first job is working out exactly what it is. Every iPad looks broadly similar from the front, but display construction varies by model, and that changes the part, the price, and the difficulty of the repair.
This one reported its model number as A2602, which identifies it as a 9th-generation iPad. That single detail matters more than it looks, because the 9th generation uses what's called a non-laminated display.
In a non-laminated design, the front glass with its touch layer, the digitizer, is a distinct component sitting above the LCD rather than bonded to it. Other iPads, including many Air, Pro, and mini models, use fully laminated displays where glass and LCD are fused into one assembly and the repair strategy is different. Getting the model right is what prevents ordering the wrong part or replacing a perfectly good LCD.
The Finding That Saved Most of the Cost
Two things were true about this iPad at the same time: the glass was badly cracked, but the picture was still perfect and the touchscreen still responded across the whole panel.
That combination is good evidence for a digitizer-only repair. There were no visible LCD defects, no lines or bleeding or dead areas, and touch worked everywhere it was tested. The LCD was kept, and the completed repair was tested again before the iPad was sealed, which is what turns a reasonable expectation into a confirmed result.
So the job became a glass-and-digitizer replacement only. The original LCD stays in the device. Less waste, a lower parts cost, and the same screen quality the iPad left the factory with.
Choosing the Replacement Part
Replacement digitizers differ in construction and quality, and the differences aren't visible when the part is sitting in its packaging. One that matters here is insulation on the back of the panel: iFixit specifically notes that insufficient insulation can let parts of the digitizer ground against other components and produce "ghost" or phantom touch input, meaning the screen registers taps nobody made.
For this repair I used an iFixit iPad 9 replacement digitizer. iFixit states that its replacement digitizers include the required insulation, and the part carries a lifetime guarantee. On a repair where most of the cost is careful labor, spending a little more on a documented part is the cheaper decision. Redoing the job because of a bad panel costs far more than the panel did.
The Careful Part of the Job
With the diagnosis settled and the right part in hand, the repair itself is a sequence of deliberate, low-force steps. This is where patience matters far more than strength.
- 1
Separate the glass without harming the display
The front glass is held to the aluminum frame by adhesive around its entire perimeter. It gets warmed to soften that adhesive, then worked loose gradually with thin picks. Cracked glass wants to shatter further as it comes up, so the face is covered first to contain fragments. The whole time, the goal is protecting the reusable LCD beneath from scratches, debris, and tool marks.
- 2
Preserve and transfer the original Touch ID button
This is the step that isn't obvious from looking at a replacement screen. The Touch ID fingerprint sensor lives in the home button, and Apple pairs that specific button to that specific iPad's logic board. Install a different button, even one that comes bundled with a new panel, and Touch ID stops working permanently. So the original button and its very thin ribbon cable have to be carefully freed from the old glass and moved to the new one, without stretching, creasing, or tearing the flex.
- 3
Reseat the home-button bracket correctly
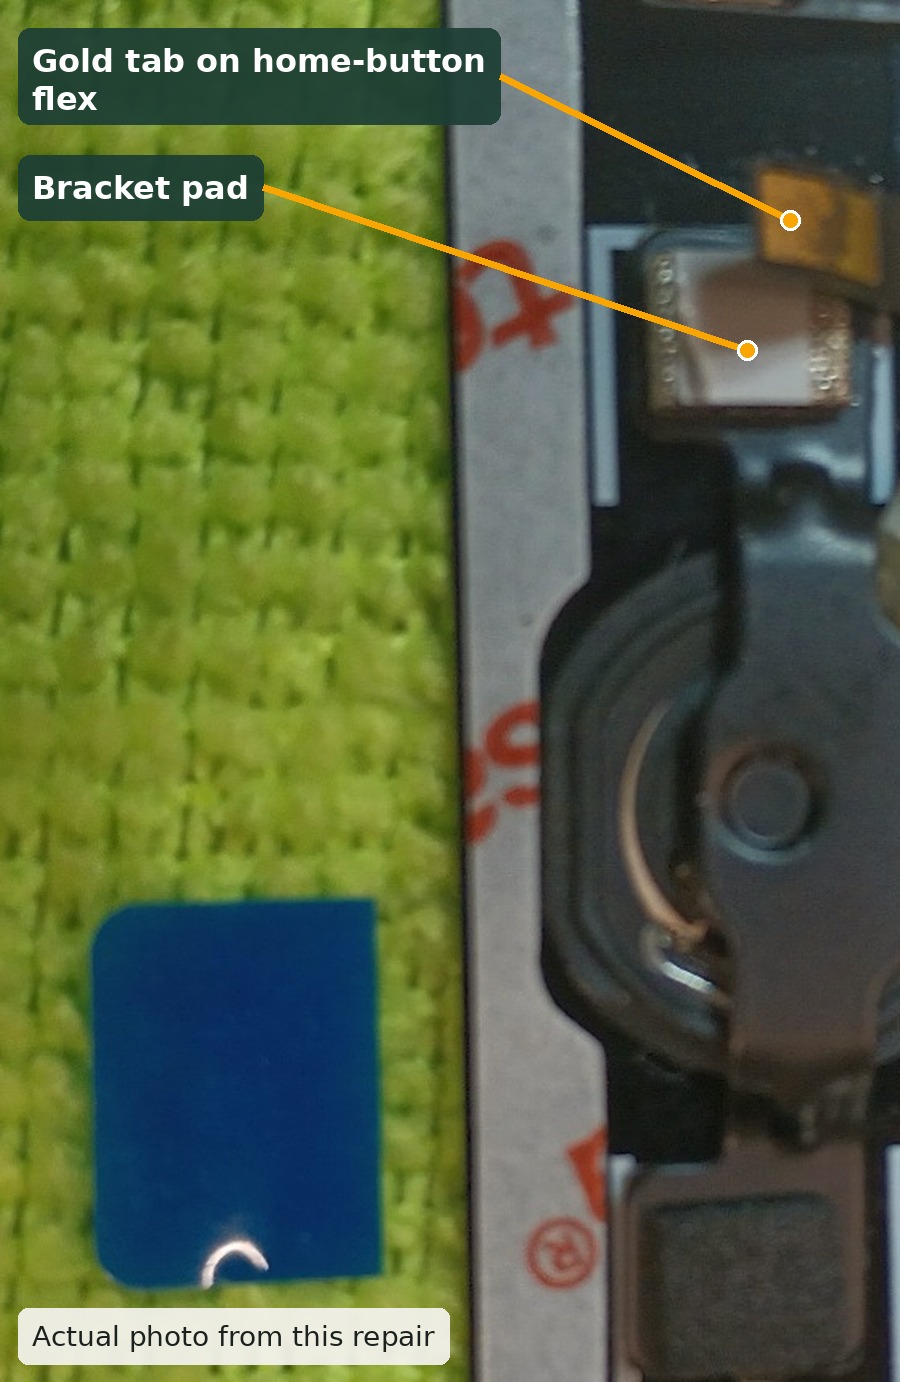
Behind the button sits a small metal support bracket. On reassembly, the rectangular metal-contact section of the home-button flex gets stuck back down onto that bracket area, which is not a plug and not a solder joint. The bracket controls how the button feels when it's pressed, and iFixit warns that bending or warping it can cost the button its normal click. It goes back onto the new front panel with a high-bond adhesive.
- 4
Reconnect the display cables: alignment, not force
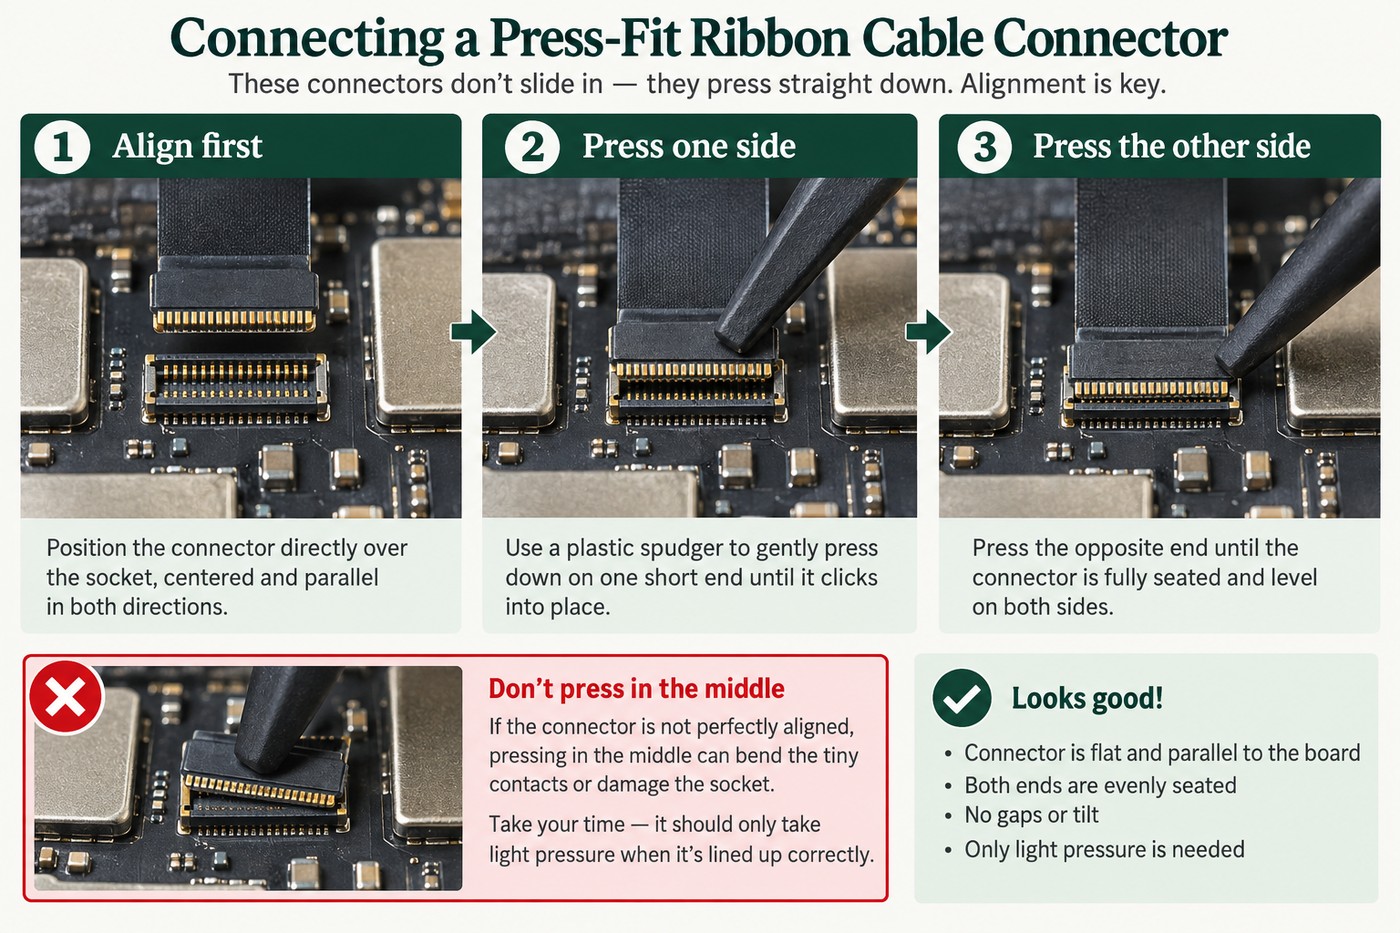
With the battery isolated, the digitizer reconnects to the logic board through two small press-fit connectors. The key is alignment: each connector should sit squarely over its socket before any pressure is applied, then one side is pressed down followed by the other. iFixit specifically warns against pressing in the middle, because a misaligned press connector can bend pins and cause permanent damage. If it's fighting back, that's the signal to stop and re-check the alignment rather than force it.
- 5
Clean the LCD before it's sealed away
With the display open, a trapped fingerprint or dust speck becomes very noticeable once the new glass goes down over it, and getting it out afterward means opening the iPad again. The LCD was inspected and cleaned gently with a clean microfiber and an optical-safe wipe used sparingly. Separately, the frame's adhesive surfaces were cleared of old residue and prepared with high-concentration isopropyl alcohol so the fresh perimeter adhesive could bond correctly.
- 6
Test everything before committing the adhesive
The new glass is held in place and the iPad is powered on for a full test: picture, touch response across the entire screen, the home button, Touch ID, general operation, all before the permanent perimeter adhesive is set. It's far cheaper to find a loose connector while the device is still open than after it's sealed. Only once everything checks out does the iPad get closed up for good.
From the Bench: The Parts You Don't Pry Near
A repair like this is as much about knowing where not to put a tool as where to put one. iFixit flags the front camera, the antennas, the display cables, and the ambient-light sensors as sensitive areas during screen removal. The bottom antennas in particular can be damaged by an opening pick used too deeply or moved in the wrong direction. Once the LCD is lifted, the battery is isolated before the display connectors come off. Experience here isn't about speed. It's about not creating a second problem while fixing the first.
The Result
The iPad went back to its owner with new glass, its original display, and a working Touch ID button, tested for picture, full-screen touch response, button feel, and fingerprint unlock before it was sealed.
The visible problem was one cracked sheet of glass. Repairing it properly meant working through adhesive removal, protecting a reusable LCD, handling a paired security sensor, reseating fragile mechanical parts, connecting microscopic contacts, and cleaning an optical surface. Then knowing, at each step, when to stop and inspect instead of pushing harder. What the customer got out of all that was a repair that replaced one part instead of a device.
What This Job Shows About How We Work
Identify the exact model before quoting the repair.
A model number decided whether this was a glass replacement or a full display-assembly replacement. Two iPads that look alike from across the room can be very different jobs.
Replace what's broken, keep what isn't.
The LCD was tested, found good, and left in the device. That's a smaller parts bill for the customer and one less working component in a landfill.
Some mistakes can't be undone.
Touch ID is paired to the logic board. Lose or damage the original button and no replacement part brings the feature back. Knowing which steps are irreversible is what makes the slow ones worth it.
Part quality shows up later, not on the bench.
A digitizer with inadequate insulation can look perfect on day one and develop phantom touch afterward. Using a documented part with a guarantee behind it is how we keep a repair from coming back.
Test before you seal, not after.
Every function gets checked while the device is still open and the adhesive is still uncommitted. Finding a loose connector at that moment costs minutes; finding it later costs the whole reassembly.
Technical References
iFixit's iPad 9 Screen Digitizer Replacement guide documents the paired Touch ID sensor, the press connectors, the antenna hazards, the bracket adhesive, the insulation issue, and the reassembly checks referenced on this page. The replacement part used here was the iFixit iPad 9 Screen Digitizer.
Cracked Screen? Find Out What It Actually Needs.
Tablets, phones, laptops, TVs: the first question is always which part actually broke, because that's what decides the price. We'll tell you honestly what we find, including when the repair isn't worth it. See what diagnosis and repair cost before you book.
Not sure it's worth fixing? Tell us the make, model, and what it's doing, or call (509) 708-2953 — no charge to ask, and nothing to book. Send us the details →
That conversation can usually tell you whether a repair is worth pursuing and which diagnostic fits. A firm repair price takes having the device in hand.
Nothing is charged when you book a drop-off. The $50 diagnostic, and the pickup fee if you'd like us to collect the device and bring it back, are billed on your final invoice. No transport charge if you bring it to Leavenworth yourself.